Introduction
Welcome to the documentation for the CommandAPI. The CommandAPI lets you create vanilla Minecraft commands which utilize the new command features which were implemented in Minecraft 1.13, including but not limited to:
- Having commands compatible with the vanilla
/executecommand - Having commands which can be run using Minecraft functions
- Having better auto-completion and suggestions
- Having command type checks before execution (e.g. ensuring a number is within a certain range)
How the CommandAPI works
Developer's Note:
This is a pretty important section, I would recommend reading before implementing the CommandAPI in your own projects. This section tells you about setup which is not stated anywhere else in the documentation. Think of it as the "knowledge you should know before using this API".
The CommandAPI does not follow the "standard" method of registering commands. In other words, commands which are registered with the CommandAPI will be registered as pure vanilla Minecraft commands as opposed to Bukkit or Spigot commands. This means that the following implications exist:
- Commands do not need to be declared in the
plugin.ymlfile - Commands are not "linked" to a certain plugin. In other words, you cannot look up which commands are registered by which plugin.
How this documentation works
This documentation is split into the major sections that build up the CommandAPI. It's been designed in such a way that it should be easy to find exactly what you want to help you get started with the CommandAPI, and how to make effective use of it. Each step of the way, the documentation will include examples which showcase how to use the CommandAPI.
You can use the side bar on the left to access the various sections of the documentation and can change the theme to your liking using the paintbrush icon in the top left corner.
Using the search icon in the top left corner, you can search for anything in this entire documentation. For example, typing "Example" will show a list of examples which are included throughout the documentation.
Documentation updates
Whenever a new version of the CommandAPI comes out, the version number changes (as you'd expect). In the same manner, if any changes to the documentation were made, the documentation version number changes. Ensure you keep up to date on the latest changes to the documentation (You can view the documentation version at the top of the page) when new versions of the CommandAPI are released. This changelog below gives a brief overview of the changes to pages that were made between each version of the documentation, as only the latest version of the documentation is hosted online.
Documentation changes 2.1 \(\rightarrow\) 3.0:
Developer's Note:
Lots of changes occurred in version 3.0. I highly recommend reading the Upgrading guide section which covers the changes in more detail and how to update your plugin for this version.
- Sections on the left have been tidied up and should be more "approachable"
- Installation section (1. Installation for server owners) now includes information about additional dependencies
- Dependency section (2. Setting up your development environment) updated to use the new dependency Group ID
- Command registration section (3. Command registration) updated to reflect new API changes
- Command execution section (4. Command Executors) updated to reflect new API changes
- Arguments section (5. Arguments) completely rewritten to reflect new API changes. Adds more detailed examples for each argument
- Function arguments section (6.3 Function Arguments) updated to reflect new API changes
- Permissions section (7. Permissions) updated to reflect new API changes
- Aliases section (8. Aliases) updated to reflect new API changes
- Command conversion section (9. Command conversion) rewrite example to be more detailed
Installation
Installing the CommandAPI is easy! Just download the latest CommandAPI.jar file using the button below and place it in your server's plugins folder!
Download latest CommandAPI.jar
Additional dependencies
- If you use NBT data, you'll also need the NBT API. (you can find out from your developers if you need this or not)
- If you are using raw JSON chat data, you'll need to be running Spigot or another spigot-related server such as Paper Spigot or Taco Spigot. (Again, you can find out from your developers if you need this or not)
Configuring the CommandAPI
The CommandAPI can be configured in the plugins/CommandAPI/config.yml file.
The default config.yml settings are as follows:
verbose-outputs: true
create-dispatcher-json: false
verbose-outputs- Outputs command registration and unregistration logs in the consolecreate-dispatcher-json- Creates acommand_registration.jsonfile showing the mapping of registered commands
Setting up your development environment
To use the CommandAPI in your plugins, there are a few methods of adding it to your development environment.
Manually using the .jar
-
Download the latest CommandAPI.jar from the download page here
-
Add the CommandAPI.jar file to your project/environment's build path:
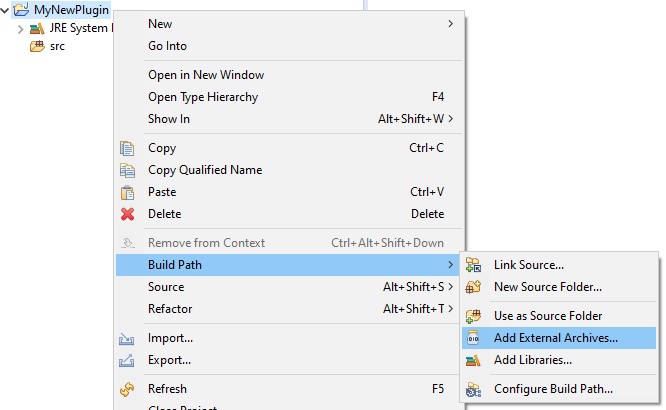
-
Add the CommandAPI as a dependent in the plugin.yml (
depend: [CommandAPI])
Using Maven (recommended)
Developer's Note:
If you've never used maven before, I highly recommend it! It makes it easier to keep your code updated with the latest dependency updates. For information on how to set up a plugin using maven, you can read Bukkit's plugin tutorial.
-
Add the maven repository to your
pom.xmlfile:<repositories> <repository> <id>mccommandapi</id> <url>https://raw.githubusercontent.com/JorelAli/1.13-Command-API/mvn-repo/1.13CommandAPI/</url> </repository> </repositories> -
Add the dependency to your
pom.xml:<dependencies> <dependency> <groupId>dev.jorel</groupId> <artifactId>commandapi</artifactId> <version>VERSION</version> </dependency> </dependencies>A list of version numbers can be found here For example, if you wanted to use version 3.0, you would use
<version>3.0</version> -
Add the CommandAPI as a dependent in the plugin.yml (
depend: [CommandAPI])
Please Note:
In version 3.0 onwards, the group ID is no longer
io.github.jorelali. Instead, the group ID isdev.jorel, as shown above. If you would like to use a version of the CommandAPI that is less than 3.0, you must make sure the group ID isio.github.jorelali.
Using Gradle
-
Add the repository to your
build.gradlefile:repositories { maven { name = 'mccommandapi' url = 'https://raw.githubusercontent.com/JorelAli/1.13-Command-API/mvn-repo/1.13CommandAPI/' } } -
Add the dependency to your list of dependencies in your
build.gradlefile:dependencies { compile "dev.jorel:commandapi:VERSION" }A list of version numbers can be found here. For example, if you wanted to use version 3.0, you would use
compile "dev.jorel:commandapi:3.0" -
Add the CommandAPI as a dependent in the plugin.yml (
depend: [CommandAPI])
Command registration
To register commands with the CommandAPI, we use the CommandAPICommand class. It follows a simple builder pattern to improve readability.
I think the easiest way to explain it is with an example:
// Create our arguments
LinkedHashMap<String, Argument> arguments = new LinkedHashMap<>();
arguments.put("message", new GreedyStringArgument());

//Create our command
new CommandAPICommand("broadcastmsg")
	.withArguments(arguments)                     // The arguments
	.withAliases("broadcast", "broadcastmessage") // Command aliases
	.withPermission(CommandPermission.OP)         // Required permissions
	.executes((sender, args) -> {
		String message = (String) args[0];
		Bukkit.getServer().broadcastMessage(message);
	}).register();
- First, we create our arguments for the command. This is described in more detail in the section on arguments.
- We then create a new
CommandAPICommand, with the name of the command that the sender must enter to run it. - We then add the arguments to the command with
withArguments. - In this example, we add an alias, "broadcast", to the command. This allows the sender to use either
/broadcastmsg <message>or/broadcast <message>. - By using
withPermission, we require the sender to be an OP in order to run the command. - We control what the command does using
executes(this is described in more detail in the section on command executors). - Finally, we register the command to the CommandAPI using
register.
That's it! This simple snippet of code fully registers the command to the server. No hassling with a plugin instance, no messing with plugin.yml files.
CommandAPICommand methods
The CommandAPICommand has various methods, which are outlined below:
Setting the command name
new CommandAPICommand(String)- This constructor is used to set the command's name.
Setting command properties
-
withArguments(LinkedHashMap<String, Argument>)- The list of arguments.The CommandAPI requires a list of arguments which are used for the command. The argument map consists of a key which is the tooltip that is displayed as a prompt to users entering commands, and a value which is an instance of an argument (See the section on arguments). This list of arguments is interpreted in the order that arguments are added to the LinkedHashMap.
-
withPermission(CommandPermission)- The required permission to execute a command. (See the section on permissions). -
withAliases(String... args)- An array of aliases that the command can be run via.
Setting the command's executor
executes((sender, args) -> {})- Executes a command using theCommandSenderobject.executesPlayer((player, args) -> {})- Executes a command using thePlayerobject.executesEntity((entity, args) -> {})- Executes a command using theEntityobject.executesCommandBlock((cmdblock, args) -> {})- Executes a command using theBlockCommandSenderobject.executesConsole((console, args) -> {})- Executes a command using theConsoleCommandSenderobject.executesProxy((proxy, args) -> {})- Executes a command using theProxiedCommandSenderobject.
Developer's Note:
Sometimes, the Java compiler throws an error saying that a method is ambiguous for the type CommandAPICommand. This is due to a limitation in Java's type inference system and is not a fault of the CommandAPI. If we take the following code, used to spawn a pig:
new CommandAPICommand("spawnpigs")
 .executesPlayer((player, args) -> {
     for(int i = 0; i < 10; i++) {
         player.getWorld().spawnEntity(player.getLocation(), (EntityType) args[0]);
     }
 })
 .register();
The Java type inference system cannot determine what the type of the lambda
(player, args) -> ()is, therefore it produces the following compilation error:The method executesPlayer(PlayerCommandExecutor) is ambiguous for the type CommandAPICommandThis can easily be resolved by declaring the specific type of the command sender and the arguments. For example:
new CommandAPICommand("spawnpigs")
 .executesPlayer((Player player, Object[] args) -> {
     for(int i = 0; i < 10; i++) {
         player.getWorld().spawnEntity(player.getLocation(), (EntityType) args[0]);
     }
 })
 .register();
Registering the command
register()- Registers the command.
Command loading order
In order to register commands properly, commands must be registered before the server finishes loading. The CommandAPI will prevent command registration after the server has loaded. This basically means that all command registration must occur during a plugin's onLoad() or onEnable() method. With the CommandAPI, depending on whether you use onLoad() or onEnable() to load your commands depends on whether your plugin is used with Minecraft's functions:
| When to load | What to do |
|---|---|
onLoad() method | Register commands to be used in Minecraft functions (see the Function section for more info) |
onEnable() method | Register regular commands |
Command unregistration
The CommandAPI has support to unregister commands completely from Minecraft's command list. This includes Minecraft built in commands!
| Method | Result |
|---|---|
CommandAPI.unregister(String cmd) | Unregisters a command from the game |
CommandAPI.unregister(String cmd, boolean force) | Attempts to unregister a command from the game by force. This includes /minecraft:cmd, /bukkit:cmd and /spigot:cmd commands as well. |
Example - Replacing Minecraft's /gamemode command
To replace a command, we can first unregister it and then register our implementation of that command.
//Unregister the gamemode command from the server (by force)
CommandAPI.getInstance().unregister("gamemode", true);

LinkedHashMap<String, Argument> arguments = new LinkedHashMap<>();

/* Arguments for the gamemode command. In this sample, I'm just
 * using a simple literal argument which allows for /gamemode survival */
arguments.put("gamemode", new LiteralArgument("survival"));

new CommandAPICommand("gamemode")
    .withArguments(arguments)
    .executes((sender, args) -> {
        //Implementation of our /gamemode command
    }).register();
Developer's Note:
Command unregistration, although powerful, is highly unrecommended. It is the CommandAPI's most "dangerous" feature as it can cause unexpected sideffects, such as command blocks executing commands you wouldn't expect them to. In almost every case, I'd recommend just creating a new command instead of unregistering one to replace it.
For instance, instead of unregistering
/gamemode, you could register a command/gmor/changegamemode.
Command executors
Developer's Note:
This section can be a little bit difficult to follow. If you only want the bare basic features (executes a command), read the section on Normal command executors - this behaves very similar to the
onCommandmethod in Bukkit.
The CommandAPI provides various command executors which are lambdas which execute the code you want when a command is called. With a lot of simplification, there are two main types of command executors:
- Ones that just runs the command (let's call it a normal command executor)
- Ones that returns an integer as a result (let's call it a resulting command executor)
Developer's Note:
In general, you need not focus too much on what type of command executor to implement. If you know for certain that you're going to be using your command with command blocks, and specifically want to state whether a command returns a value, just ensure you return an integer at the end of your declared command executor. Java will infer the type (whether it's a normal command executor or a resulting command executor) automatically, so feel free to return an integer or not.
In addition to these two types of command executors, there are ways to restrict the execution of commands to certain CommandSender subclasses. In other words, you can make commands executable by players in game only for instance. These restrictions are covered in more detail in Normal command executors.
Normal command executors
Command executors are of the following format, where sender is a CommandSender, and args is an Object[], which represents arguments which are parsed by the CommandAPI.
new CommandAPICommand("...").executes((sender, args) -> {
    //Code here
}).register();
With normal command executors, these do not need to return anything. By default, this will return a success value of 1 if it runs successfully, and a success value of 0 if it runs unsuccessfully, either by throwing an exception (RuntimeException) or by forcing the command to fail (See the section on handling command failures.
In short, this is what values are returned when a command is executed from a normal command executor:
| Command Works | Command Doesn't Work | |
|---|---|---|
| Success Value | 1 | 0 |
| Result Value | 1 | 0 |
Example - Creating a message broadcasting system
To illustrate this, let's take a look at a simple message broadcasting command. We declare our arguments (in this case, "message"), we provide some aliases and set a permission required to run the command. Then we declare our main command body by using the .executes() method, before finally registering the command:
// Create our arguments
LinkedHashMap<String, Argument> arguments = new LinkedHashMap<>();
arguments.put("message", new GreedyStringArgument());

//Create our command
new CommandAPICommand("broadcastmsg")
    .withArguments(arguments)                     // The arguments
    .withAliases("broadcast", "broadcastmessage") // Command aliases
    .withPermission(CommandPermission.OP)         // Required permissions
    .executes((sender, args) -> {
        String message = (String) args[0];
        Bukkit.getServer().broadcastMessage(message);
    }).register();
Note how when we finish up our implementation of .executes(), we don't return anything. This is unlike commands in the standard Bukkit API where the onCommand method returns a Boolean value:
boolean onCommand(CommandSender, Command, String, String[])
The returning of this Boolean value is handled automatically by the CommandAPI on a much lower level.
Restricting who can run your command
The CommandAPICommand has multiple different executes...() methods that can restrict the command sender to any of the following objects:
CommandSender- No restriction, players, the console etc. can use this command. This is what Bukkit normally uses.Player- Only in-game players can run this commandEntity- Only entities (therefore, players as well) can run this commandBlockCommandSender- Only command blocks can run this commandConsoleCommandSender- Only the console can run this commandProxiedCommandSender- Only proxied command senders (e.g. other entities via the/execute as ...command)
This is done using the respective method:
| Restricted sender | Method to use |
|---|---|
CommandSender | .executes() |
Player | .executesPlayer() |
Entity | .executesEntity() |
BlockCommandSender | .executesCommandBlock() |
ConsoleCommandSender | .executesConsole() |
ProxiedCommandSender | .executesProxy() |
Example - A /suicide command
Say we wanted to create a command /suicide, which kills the player that executes it. Since this command isn't really "designed" for command senders that are not players, we can restrict it so only players can execute this command (meaning that the console and command blocks cannot run this command). Since it's a player, we can use the .executesPlayer() method:
new CommandAPICommand("suicide")
    .executesPlayer((player, args) -> {
		player.setHealth(0);
    }).register();
Multiple command executor implementations
The CommandAPI allows you to chain different implementations of the command depending on the type of CommandSender. This allows you to easily specify what types of CommandSenders are required to run a command.
Extending on the suicide example above, we could write another implementation for a different CommandSender. Here, we write an implementation to make entities (non-player) go out with a bang when they run the command (using /execute as <entity> run <command> command).
Example - A /suicide command with different implementations
new CommandAPICommand("suicide")
    .executesPlayer((player, args) -> {
		player.setHealth(0);
    })
    .executesEntity((entity, args) -> {
        entity.getWorld().createExplosion(e.getLocation(), 4);
		entity.remove();
    }).register();
This saves having to use instanceof multiple times to check the type of the CommandSender.
Proxied commandsenders
The CommandAPI has extra support for vanilla Minecraft's /execute command, by allowing the CommandSender to be an instance of the ProxiedCommandSender class. This allows the CommandSender to contain two extra pieces of information: The "proxied sender" and the original sender.
Example - Running a command as a chicken
Say we have a command which kills the sender of a command. This is easily implemented as follows:
new CommandAPICommand("killme")
    .executesPlayer((player, args) -> {
		player.setHealth(0);
	})
    .register();
But what if the sender of the command is not a player? By using Minecraft's /execute command, we could execute the command as any arbitrary entity, as shown with the command below:
/execute as @e[type=chicken] run killme
To handle this case, we can use the .executesProxy() method to ensure that the command sender is a ProxiedCommandSender. Then, we can kill the callee (the entity which is being 'forced' to run the command /killme)
new CommandAPICommand("killme")
    .executesPlayer((player, args) -> {
		player.setHealth(0);
	})
    .executesProxy((proxy, args) -> {
		//Check if the callee is an Entity
		if(proxy.getCallee() instanceof LivingEntity) {

			//If so, kill the entity
			LivingEntity target = (LivingEntity) proxy.getCallee();
			target.setHealth(0);
		}
    })
    .register();
This allows the command above to run successfully, killing all chickens it can find.
Resulting command executors
Resulting command executors are very similar to normal command executors, except they can return an integer result value.
(sender, args) -> {
	//Code here
	return /*some integer here*/ ;
};
Similarly, these will return a success value of 1 if it runs successfully, and a success value of 0 if it runs unsuccessfully. If a success value of 0 occurs, the result value will be 0. In short:
| Command Works | Command Doesn't Work | |
|---|---|---|
| Success Value | 1 | 0 |
| Result Value | result defined in your code | 0 |
The concept of result values are better explained through examples:
Example - Random number result command
Say we want a command that returns a random number as a result. This can then be used by vanilla Minecraft's /execute store result ... command, which can be used for other command block chains.
new CommandAPICommand("randnum")
    .executes((sender, args) -> {
        return new Random().nextInt();
    })
    .register();
This returns a success value of 1 (Because no errors or CommandAPI.fail(String) was thrown) and a result value of a random number.
Example - Lootbox system with /execute command
We can store state using /execute store and we can perform conditional checks using /execute if. By combining these, we can create a system which can be used with commandblocks to say, give players random lootboxes and redeem them. The concept is to create a command that generates a random number from 1 to 100. If the number is 1 (thus, the chance of being chosen is \(\frac{1}{100}\)), then we award a player with some reward, say 64 diamonds.
To do this, we'll declare two commands:
/randomnumber        - returns a random number between 1 and 99 (inclusive)
/givereward <player> - gives a player 64 diamonds and broadcasts it in the chat
Since we're declaring commands that are to be used in /execute, we must ensure that these commands are registered in your plugin's onLoad() method. First, we write our implementation for /randomnumber. It is fairly straight forward using Java's ThreadLocalRandom to generate a random number:
//Register random number generator command from 1 to 99 (inclusive)
new CommandAPICommand("randomnumber")
    .executes((sender, args) -> {
        return ThreadLocalRandom.current().nextInt(1, 100); //Returns random number from 1 <= x < 100
    })
    .register();
Now we write our implementation for /givereward. In this example, we use the EntitySelectorArgument to select a single player. We cast it to Player and then add the items to their inventory.
//Register reward giving system for a target player
LinkedHashMap<String, Argument> arguments = new LinkedHashMap<>();
arguments.put("target", new EntitySelectorArgument(EntitySelector.ONE_PLAYER));

new CommandAPICommand("givereward")
    .withArguments(arguments)
    .executes((sender, args) -> {
        Player player = (Player) args[0];
        player.getInventory().addItem(new ItemStack(Material.DIAMOND, 64));
        Bukkit.broadcastMessage(player.getName() + " won a rare 64 diamonds from a loot box!");
    })
    .register();
Now that we've declared these commands, we can now use them in practice. We can use a command block to store a random number under the scoreboard score randVal for a player called SomePlayer, by executing the command /randomnumber. Since /randomnumber returns an integer, this value is stored in the scoreboard score:
/execute store result score SomePlayer randVal run randomnumber
To check if the random number is equal to 1, we can use the /execute if command. If their score stored in randVal matches 1, then we run the /givereward command.
/execute if score SomePlayer randVal matches 1 run givereward SomePlayer
Handling command failures
Sometimes, you want your command to fail on purpose. This is basically the way to "gracefully" handle errors in your command execution. This is performed using the following method:
CommandAPI.fail("Error message goes here");
When the CommandAPI calls the fail method, it will cause the command to return a success value of 0, to indicate failure.
Example - Command failing for element not in a list
Say we have some list containing fruit and the player can choose from it. In order to do that, we can use a StringArgument and suggest it to the player using .overrideSuggestions(String[]). However, because this only lists suggestions to the player, it does not stop the player from entering an option that isn't on the list of suggestions.
Therefore, to gracefully handle this with a proper error message, we use CommandAPI.fail(String) with a meaningful error message which is displayed to the user.
//Array of fruit
String[] fruit = new String[] {"banana", "apple", "orange"};

//Argument accepting a String, suggested with the list of fruit
LinkedHashMap<String, Argument> arguments = new LinkedHashMap<>();
arguments.put("item", new StringArgument().overrideSuggestions(fruit));

//Register the command
new CommandAPICommand("getfruit")
    .withArguments(arguments)
    .executes((sender, args) -> {
        String inputFruit = (String) args[0];
        if(fruit.contains(inputFruit)) {
            //Do something with inputFruit
        } else {
            //The player's input is not in the list of fruit
            CommandAPI.fail("That fruit doesn't exist!");
        }
	})
    .register();
Developer's Note:
In general, it's a good idea to handle unexpected cases with the
CommandAPI.fail()method. Most arguments used by the CommandAPI will have their own built-in failsafe system (e.g. theEntitySelectorArgumentwill not execute the command executor if it fails to find an entity), so this feature is for those extra cases.
Arguments
Arguments in the CommandAPI are registered by using a LinkedHashMap<String, Argument> object. There are two things you need to keep in mind when creating arguments:
- The order which they will be used
- The type of each argument
By definition of a LinkedHashMap, the order of the elements inserted into it are preserved, meaning the order you add arguments to the LinkedHashMap will be the resulting order of which arguments are presented to the user when they run that command.
Adding arguments for registration is simple:
//Create LinkedHashMap
LinkedHashMap<String, Argument> arguments = new LinkedHashMap<>();

//Add an argument called "target", which is a PlayerArgument
arguments.put("target", new PlayerArgument());
The String value is the tooltip that is shown to a player when they are entering the command.
Argument Casting
To access arguments, they have to be casted to the type that the argument represents. The order of the arguments in the args[] is the same as the order in which the arguments were declared.
LinkedHashMap<String, ArgumentType> arguments = new LinkedHashMap<>();
arguments.put("arg0", new StringArgument());
arguments.put("arg1", new PotionEffectArgument());
arguments.put("arg2", new LocationArgument());

new CommandAPICommand("cmd")
    .withArguments(arguments)
    .executes((sender, args) -> {
        String stringArg = (String) args[0];
        PotionEffectType potionArg = (PotionEffectType) args[1];
        Location locationArg = (Location) args[2];
    })
	.register();
The type to cast each argument (declared in the dev.jorel.commandapi.arguments package) is listed below:
| Argument class | Data type |
|---|---|
AdvancementArgument | org.bukkit.advancement.Advancement |
AxisArgument | java.util.EnumSet<org.bukkit.Axis> |
BiomeArgument | org.bukkit.block.Biome |
BooleanArgument | boolean |
ChatArgument | net.md_5.bungee.api.chat.BaseComponent[] |
ChatColorArgument | org.bukkit.ChatColor |
ChatComponentArgument | net.md_5.bungee.api.chat.BaseComponent[] |
CustomArgument<T> | T |
DoubleArgument | double |
EnchantmentArgument | org.bukkit.enchantments.Enchantment |
EntitySelectorArgument | The cast type changes depending on the input parameter:
|
EntityTypeArgument | org.bukkit.entity.EntityType |
EnvironmentArgument | org.bukkit.World.Environment |
FloatArgument | float |
FloatRangeArgument | dev.jorel.commandapi.wrappers.FloatRange |
FunctionArgument | dev.jorel.commandapi.wrappers.FunctionWrapper[] |
GreedyStringArgument | String |
IntegerArgument | int |
IntegerRangeArgument | dev.jorel.commandapi.wrappers.IntegerRange |
ItemStackArgument | org.bukkit.inventory.ItemStack |
LiteralArgument | N/A |
Location2DArgument | dev.jorel.commandapi.wrappers.Location2D |
LocationArgument | org.bukkit.Location |
LongArgument | long |
LootTableArgument | org.bukkit.loot.LootTable |
MathOperationArgument | dev.jorel.commandapi.wrappers.MathOperation |
NBTCompoundArgument | de.tr7zw.nbtapi.NBTContainer |
ObjectiveArgument | String |
ObjectiveCriteriaArgument | String |
ParticleArgument | org.bukkit.Particle |
PlayerArgument | org.bukkit.entity.Player |
PotionEffectArgument | org.bukkit.potion.PotionEffectType |
RecipeArgument | org.bukkit.inventory.Recipe |
RotationArgument | dev.jorel.commandapi.wrappers.Rotation |
ScoreboardSlotArgument | dev.jorel.commandapi.wrappers.ScoreboardSlot |
ScoreHolderArgument | The cast type changes depending on the input parameter:
|
SoundArgument | org.bukkit.Sound |
StringArgument | String |
TeamArgument | String |
TextArgument | String |
TimeArgument | int |
Overriding argument suggestions
Sometimes, you want to override the list of suggestions that are provided by an argument. To handle this, the CommandAPI arguments contain two methods to override suggestions:
Argument overrideSuggestions(String... suggestions);
Argument overrideSuggestions(Function<CommandSender, String[]> suggestions);
The first method, overrideSuggestions(String... suggestions) allows you to replace the suggestions normally associated with that argument with an array of strings.
Example - Teleport to worlds by overriding suggestions
Say we're creating a plugin with the ability to teleport to different worlds on the server. If we were to retrieve a list of worlds, we would be able to override the suggestions of a typical StringArgument to teleport to that world. Let's create a command with the following structure:
/tpworld <world>
We then implement our world teleporting command using overrideSuggestions() on the StringArgument to provide a list of worlds to teleport to:
//Populate a String[] with the names of worlds on the server
String[] worlds = Bukkit.getWorlds().stream().map(World::getName).toArray(String[]::new);

//Override the suggestions of the StringArgument with the aforementioned String[]
LinkedHashMap<String, ArgumentType> arguments = new LinkedHashMap<>();
arguments.put("world", new StringArgument().overrideSuggestions(worlds));

new CommandAPICommand("tpworld")
    .withArguments(arguments)
    .executesPlayer((player, args) -> {
       	String world = (String) args[0];
		player.teleport(Bukkit.getWorld(world).getSpawnLocation());
    })
    .register();
The overrideSuggestions(Function<CommandSender, String[]> suggestions) allows you to replace the suggestions normally associated with that argument with an array of strings that are evaluated dynamically using information about the commandsender.
Example - Friend list by overriding suggestions
Say you have a plugin which has a "friend list" for players. If you want to teleport to a friend in that list, you could use a PlayerArgument, which has the list of suggestions overridden with the list of friends that that player has. Since the list of friends depends on the sender, we can use the function to determine what our suggestions should be. Let's use the following command to teleport to a friend from our friend list:
/friendtp <friend>
Let's say we have a simple class to get the friends of a command sender:
public class Friends {
    public static String[] getFriends(CommandSender sender) {
        if(sender instanceof Player) {
            return //Look up friends in a database or file
        } else {
            return new String[0];
        }
    }
}
We can then use this to generate our suggested list of friends:
LinkedHashMap<String, ArgumentType> arguments = new LinkedHashMap<>();
arguments.put("friend", new PlayerArgument().overrideSuggestions((sender) -> {
    Friends.getFriends(sender);
}));

new CommandAPICommand("friendtp")
    .withArguments(arguments)
    .executesPlayer((player, args) -> {
       	Player target = (Player) args[0];
		player.teleport(target);
    })
    .register();
Developer's Note:
The syntax of inlining the
.overrideSuggestions()method has been designed to work well with Java's lambdas. For example, we could write the above code more consisely, such as:LinkedHashMap<String, ArgumentType> arguments = new LinkedHashMap<>(); arguments.put("friend", new PlayerArgument().overrideSuggestions(Friends::getFriends));
Primitive arguments
Primitive arguments are arguments that represent Java primitive types, such as int, float, double, boolean and long. These arguments are defined in their respective classes:
| Primitive type | CommandAPI class |
|---|---|
int | IntegerArgument |
float | FloatArgument |
double | DoubleArgument |
long | LongArgument |
boolean | BooleanArgument |
These arguments simply cast to their primitive type and don't need any extra work.
Boolean arguments
The BooleanArgument class represents the Boolean values true and false.
Example - Config editing plugin
Say we want to create a plugin that lets you edit its own config.yml file using a command. To do this, let's create a command with the following structure:
/editconfig <config-key> <value>
We first retrieve the keys from the configuration file using the typical Bukkit API. We construct our LinkedHashMap to hold our arguments, with the first parameter being a String key (in the form of a TextArgument, overridden with an array of suggestions). Finally, we register our command and update the config, ensuring that we cast the BooleanArgument to boolean:
// Load keys from config file
String[] configKeys = getConfig().getKeys(true).toArray(new String[0]);

// Create arguments with the config key and a boolean value to set it to
LinkedHashMap<String, Argument> arguments = new LinkedHashMap<>();
arguments.put("config-key", new TextArgument().overrideSuggestions(configKeys));
arguments.put("value", new BooleanArgument());

// Register our command
new CommandAPICommand("editconfig")
    .withArguments(arguments)
    .executes((sender, args) -> {
        // Update the config with the boolean argument
        getConfig().set((String) args[0], (boolean) args[1]);
    })
    .register();
Numerical arguments
Numbers are represented using the designated number classes:
| Class | Description |
|---|---|
IntegerArgument | Whole numbers between Integer.MIN_VALUE and Integer.MAX_VALUE |
LongArgument | Whole numbers between Long.MIN_VALUE and Long.MAX_VALUE |
DoubleArgument | Double precision floating point numbers |
FloatArgument | Single precision floating point numbers |
Each numerical argument can have ranges applied to them, which restricts the user to only entering numbers from within a certain range. This is done using the constructor, and the range specified:
| Constructor | Description |
|---|---|
new IntegerArgument() | Any range |
new IntegerArgument(min) | Values greater than or equal to min |
new IntegerArgument(min, max) | Values greater than or equal to min and less than or equal to max |
Each range is inclusive, so it includes the number given to it. If the minimum value provided is larger than the maximum value, an InvalidRangeException is thrown.
Ranged arguments
Ranged arguments allow players to provide a range between two numbers, all within a single argument. The CommandAPI provides two ranged arguments, IntegerRangeArgument for ranges with only integer values, and FloatRangeArgument for ranged with potential floating point values.
These consist of values such as:
| Input | What it means |
|---|---|
5 | The number 5 |
5..10 | Numbers between 5 and 10, including 5 and 10 |
5.. | Numbers greater than or equal to 5 (bounded by Java's max number size) |
..5 | Numbers less than or equal to 5 (bounded by Java's min number size) |
This allows you to let users define a range of values, which can be used to limit a value, such as the number of players in a region or for a random number generator.
The IntegerRange & FloatRange class
The CommandAPI returns an IntegerRange from the IntegerRangeArgument, and a FloatRange from the FloatRangeArgument, which represents the upper and lower bounds of the numbers provided by the command sender, as well as a method to check if a number is within that range.
The IntegerRange class has the following methods:
class IntegerRange {
    public int getLowerBound();
    public int getUpperBound();
    public boolean isInRange(int);
}
The FloatRange class has the following methods:
class FloatRange {
    public float getLowerBound();
    public float getUpperBound();
    public boolean isInRange(float);
}
Example - Searching chests for certain items
Say you're working on a plugin for server administrators to help them find restricted items. A method of doing so would be to search chests in a given radius for certain items. As such, we can use the following structure:
/searchchests <range> <item>
Now, we simply create our arguments using IntegerRangeArgument for our range and ItemStackArgument as the item to search for. We can then find all chests in a given area and determine if it is within the range provided by the command sender by using range.isInRange(distance):
// Declare our arguments for /searchrange <IntegerRange> <ItemStack>
LinkedHashMap<String, Argument> arguments = new LinkedHashMap<>();
arguments.put("range", new IntegerRangeArgument());
arguments.put("item", new ItemStackArgument());

new CommandAPICommand("searchrange")
    .withArguments(arguments)
    .executesPlayer((player, args) -> {
        // Retrieve the range from the arguments
        IntegerRange range = (IntegerRange) args[0];
        ItemStack itemStack = (ItemStack) args[1];

        // Store the locations of chests with certain items
        List<Location> locations = new ArrayList<>();

        // Iterate through all chunks, and then all tile entities within each chunk
        for(Chunk chunk : player.getWorld().getLoadedChunks()) {
            for(BlockState blockState : chunk.getTileEntities()) {

                // The distance between the block and the player
                int distance = (int) blockState.getLocation().distance(player.getLocation());

                // Check if the distance is within the specified range
                if(range.isInRange(distance)) {

                    // Check if the tile entity is a chest
                    if(blockState instanceof Chest) {
                        Chest chest = (Chest) blockState;

                        // Check if the chest contains the item specified by the player
                        if(chest.getInventory().contains(itemStack.getType())) {
                            locations.add(chest.getLocation());
                        }
                    }
                }

            }
        }

        // Output the locations of the chests, or whether no chests were found
        if(locations.isEmpty()) {
            player.sendMessage("No chests were found");
        } else {
            player.sendMessage("Found " + locations.size() + " chests:");
            locations.forEach(location -> {
                player.sendMessage("  Found at: "
                        + location.getX() + ", "
                        + location.getY() + ", "
                        + location.getZ());
            });
        }
    })
    .register();
String arguments
There are three types of arguments that return Java's String object. Each have their own unique set of features which make them suitable for specific needs.
String argument
The StringArgument class is used to represent a single word. These words can only contain alphanumeric characters (A-Z, a-z and 0-9), and the underscore character.
Accepted StringArgument values:
Hello
123
hello123
Hello_world
Rejected StringArgument values:
hello@email.com
yesn't
Examples of StringArgument uses:
- Entering strings to identify offline players
Text argument
The TextArgument acts similar to any String in Java. These can be single words, like to the StringArgument, or have additional characters (e.g. spaces, symbols) if surrounded by quotes. To type quotation marks, you can use \" (as similar to Java) to escape these special characters.
Accepted TextArgument values:
hello
"hello world!"
"hello@gmail.com"
"this has \" <<-- speech marks! "
Rejected TextArgument values:
hello world
私
"speech marks: ""
Examples of TextArgument uses:
- Editing the contents of a sign
- A command that requires multiple text arguments (say, username and password?)
Greedy string argument
Greedy Arguments:
The
GreedyStringArgument, similar to theChatArgumentuses the entire argument array from its current position. This means that it never ends, therefore if it is used, it must be the last element of yourLinkedHashMapof arguments.For example, if you have a command
/message <message> <target>, it would not be able to determine where the message ends and the<target>argument begins.If a
GreedyStringArgumentorChatArgumentis not declared at the end of theLinkedHashMapof arguments, or multiple of these arguments are used in the sameLinkedHashMap, the CommandAPI throws aGreedyArgumentException.
The GreedyStringArgument takes the TextArgument a step further. Any characters and symbols are allowed and quotation marks are not required.
Example - Messaging command
Say we have a simple message command of the following form:
/message <target> <message>
This would be ideal for a greedy string, since it can consume all text after the player's name:
LinkedHashMap<String, Argument> arguments = new LinkedHashMap<>();
arguments.put("target", new PlayerArgument());
arguments.put("message", new GreedyStringArgument());

new CommandAPICommand("message")
    .withArguments(arguments)
    .executes((sender, args) -> {
		((Player) args[0]).sendMessage((String) args[1]);
	})
    .register();
Any text entered after the <target> argument would be sent to the player. For example, the command could be used as follows:
/message Skepter This is some incredibly long string with "symbols" and $p3c!aL characters~
Note how this only works if the greedy string argument is at the end. If, say, the command was /message <message> <target>, it would not be able to determine where the <message> argument ends and the <target> argument begins.
Examples of GreedyStringArgument uses:
- A messaging/whisper command (as shown in the example above)
- A mailing command
- Any command involving lots of text, such as a command to write the contents of a book
- Any command which involves an unreasonable/unknown amount of arguments
- Any command where you want to parse arguments similar to how regular Bukkit would
Position-based arguments
Location arguments
In the CommandAPI, there are two arguments used to represent location. The LocationArgument argument, which represents a 3D location \( (x, y, z) \) and the Location2DArgument, which represents 2D location \( (x, z) \).
Location (3D space)
The LocationArgument class is used to specify a location in the command sender's current world, returning a Bukkit Location object. It allows the user to enter three numbers as coordinates, or use relative coordinates (i.e. the ~ and ^ operators).
The LocationArgument constructor requires a LocationType, which specifies the type of location that is accepted by the command. The LocationType enum consists of two values:
LocationType.BLOCK_POSITION
BLOCK_POSITION refers to integer block coordinates. When in-game as a player, the suggested location is the coordinates of block you are looking at when you type the command.

LocationType.PRECISE_POSITION
PRECISE_PRECISION uses exact coordinates, using the double primitive type. When in-game as a player, the suggested location is the exact coordinates of where your cursor is pointing at when you type the command.

If no LocationType is provided, the LocationArgument will use PRECISE_POSITION by default.
Example - Break block using coordinates
We can declare a simple command to break a block:
/break <location>
Simply put, given the coordinates provided to the command, "break" the block by setting it's type to Material.AIR. For this example, we're referring to block specific coordinates, so we want to use LocationType.BLOCK_POSITION:
LinkedHashMap<String, Argument> arguments = new LinkedHashMap<>();

//We want to target blocks in particular, so use BLOCK_POSITION
arguments.put("block", new LocationArgument(LocationType.BLOCK_POSITION));

new CommandAPICommand("break")
    .withArguments(arguments)
    .executesPlayer((player, args) -> {
        ((Location) args[0]).getBlock().setType(Material.AIR);
    })
    .register();
Location (2D space)
The Location2DArgument is pretty much identical in use to the LocationArgument for 3D coordinates, except instead of returning a Location object, it instead returns a Location2D object that extends Location (thus, being compatible anywhere you would normally be able to use Location).
Note:
The
Location2DArgumentcannot be used withLocationType.PRECISE_POSITIONin Minecraft 1.13. However, it can be used normally withLocationType.PRECISE_POSITIONin Minecraft versions 1.13.1 and later.
Rotation arguments
The RotationArgument allows users to specify a pair of pitch and yaw coordinates. By default (using the ~ symbol), this refers to the player's current pitch and yaw of where they are looking at.
The RotationArgument class returns a Rotation object, which consists of the following methods:
| Method name | What it does |
|---|---|
float getPitch() | Returns a player's pitch (up and down rotation) |
float getYaw() | Returns a player's yaw (left and right rotation) |
float getNormalizedPitch() | Returns a player's pitch between -90 and 90 degrees |
float getNormalizedYaw() | Returns a player's yaw between -180 and 180 degrees |
Example: Rotate an armor stand head
Say we want to make an armor stand look in a certain direction. To do this, we'll use the following command:
/rotate <rotation> <target>
To do this, we'll use the rotation from the RotationArgument and select an entity using the EntitySelectorArgument, with EntitySelector.ONE_ENTITY. We then check if our entity is an armor stand and if so, we set its head pose to the given rotation.
LinkedHashMap<String, Argument> arguments = new LinkedHashMap<>();
arguments.put("rotation", new RotationArgument());
arguments.put("target", new EntitySelectorArgument(EntitySelector.ONE_ENTITY));

new CommandAPICommand("rotate")
    .withArguments(arguments)
    .executes((sender, args) -> {
        Rotation rotation = (Rotation) args[0];
        Entity target = (Entity) args[1];

        if(target instanceof ArmorStand) {
            ArmorStand a = (ArmorStand) target;
            a.setHeadPose(new EulerAngle(Math.toRadians(rotation.getPitch()), Math.toRadians(rotation.getYaw() - 90), 0));
        }
    })
    .register();
Note how the head pose requires an EulerAngle as opposed to a pitch and yaw. To account for this, we convert our rotation (which is in degrees) into an EulerAngle in radians.
AxisArgument
The AxisArgument class refers to the x, y and z axes. When used with the CommandAPI, it returns an EnumSet<Axis> (You can view the documentation for EnumSet here).
Examples of AxisArgument uses:
- Reflecting a structure in the x, y or z axis
Chat arguments
The CommandAPI provides three main classes to interact with chat formatting in Minecraft.
Chat color argument
The ChatColorArgument class is used to represent a given chat color (e.g. red or green)
Example - Username color changing plugin
Say we want to create a plugin to change the color of a player's username. We want to create a command of the following form:
/namecolor <chatcolor>
We then use the ChatColorArgument to change the player's name color:
LinkedHashMap<String, Argument> arguments = new LinkedHashMap<>();
arguments.put("chatcolor", new ChatColorArgument());

new CommandAPICommand("namecolor")
    .withArguments(arguments)
    .executesPlayer((player, args) -> {
        ChatColor color = (ChatColor) args[0];
	    player.setDisplayName(color + player.getName());
    })
    .register();
Spigot-based chat arguments
Developer's Note:
The two following classes,
ChatComponentArgumentandChatArgumentdepend on a Spigot based server. This means that these arguments will not work on a non-Spigot based server, such as CraftBukkit. If you use this class on a non-Spigot based server, it will throw aSpigotNotFoundExceptionSpigot based servers include, but are not limited to:
Chat component argument
The ChatComponentArgument class accepts raw chat-based JSON as valid input. Despite being regular JSON, it must conform to the standard declared here, which consists of JSON that has a limited subset of specific keys (In other words, you can have a JSON object that has the key text, but not one that has the key blah).
This is converted into Spigot's BaseComponent[], which can be used for the following:
-
Broadcasting messages to all players on the server using:
Bukkit.getServer().spigot().broadcast(BaseComponent[]); -
Adding and setting pages to books using
BookMeta:BookMeta meta = // ... meta.spigot().setPages(BaseComponent[]); -
Sending messages to
Playerobjects:Player player = // ... player.spigot().sendMessage(BaseComponent[]); -
Sending messages to
CommandSenderobjects:CommandSender sender = // ... sender.spigot().sendMessage(BaseComponent[]);
Example - Book made from raw JSON
Say we want to generate a book using raw JSON. For this example, we'll use the following JSON (generated from minecraftjson.com) to generate our book:
["", {
    "text": "Once upon a time, there was a guy call "
}, {
    "text": "Skepter",
    "color": "light_purple",
    "hoverEvent": {
        "action": "show_entity",
        "value": "Skepter"
    }
}, {
    "text": " and he created the "
}, {
    "text": "CommandAPI",
    "underlined": true,
    "clickEvent": {
        "action": "open_url",
        "value": "https://github.com/JorelAli/1.13-Command-API"
    }
}]
Since we're writing a book, we must ensure that all quotes have been escaped. This can also be performed on the minecraftjson.com website by selecting "book":
["[\"\",{\"text\":\"Once upon a time, there was a guy call \"},{\"text\":\"Skepter\",\"color\":\"light_purple\",\"hoverEvent\":{\"action\":\"show_entity\",\"value\":\"Skepter\"}},{\"text\":\" and he created the \"},{\"text\":\"CommandAPI\",\"underlined\":true,\"clickEvent\":{\"action\":\"open_url\",\"value\":\"https://github.com/JorelAli/1.13-Command-API\"}}]"]
Now let's define our command. Since book text is typically very large - too large to be entered into a chat, we'll make a command block compatible command by providing a player parameter:
/makebook <player> <contents>
Now we can create our book command. We use the player as the main target by using their name for the author field, as well as their inventory to place the book. We finally construct our book using the .setPages(BaseComponent[]) method:
LinkedHashMap<String, Argument> arguments = new LinkedHashMap<>();
arguments.put("player", new PlayerArgument());
arguments.put("contents", new ChatComponentArgument());

new CommandAPICommand("makebook")
    .withArguments(arguments)
    .executes((sender, args) -> {
        Player player = (Player) args[0];
        BaseComponent[] arr = (BaseComponent[]) args[1];

        //Create book
        ItemStack is = new ItemStack(Material.WRITTEN_BOOK);
        BookMeta meta = (BookMeta) is.getItemMeta();
        meta.setTitle("Custom Book");
        meta.setAuthor(player.getName());
        meta.spigot().setPages(arr);
        is.setItemMeta(meta);

        //Give player the book
        player.getInventory().addItem(is);
    })
    .register();
Chat argument
Developer's Note:
As of the time of writing (25th June 2020), it has been observed that the
ChatArgumentdoes not work on Spigot 1.16.1. This is not the case however for Spigot versions 1.15.2 and below.
Note:
The
ChatArgumentclass is an argument similar to theGreedyStringArgument, in the sense that it has no terminator and must be defined at the end of yourLinkedHashMapof arguments. For more information on this, please read the section on Greedy arguments.
The ChatArgument is basically identical to the GreedyStringArgument, with the added functionality of enabling entity selectors, such as @e, @p and so on. The ChatArgument also returns a BaseComponent[], similar to the ChatComponentArgument.
Example - Sending personalized messages to players
Say we wanted to broadcast a "personalized" message to players on the server. By "personalized", we mean a command which changes its output depending on who we are sending the output to. Simply put, we want a command of the following structure:
/pbroadcast <message>
Say we're on a server with 2 players: Bob and Michael. If I were to use the following command:
/pbroadcast Hello @p
Bob would receive the message "Hello Bob", whereas Michael would receive the message "Hello Michael". We can use the ChatArgument to create this "personalized" broadcast:
LinkedHashMap<String, Argument> arguments = new LinkedHashMap<>();
arguments.put("message", new ChatArgument());

new CommandAPICommand("pbroadcast")
    .withArguments(arguments)
    .executes((sender, args) -> {
        BaseComponent[] message = (BaseComponent[]) args[0];

        //Broadcast the message to everyone on the server
        Bukkit.getServer().spigot().broadcast(message);
    })
    .register();
Entity & player arguments
Entity selector argument
Minecraft's target selectors (e.g. @a or @e) are implemented using the EntitySelectorArgument class. This allows you to select specific entities based on certain attributes.
The EntitySelectorArgument constructor requires an EntitySelector argument to determine what type of data to return. There are 4 types of entity selections which are available:
EntitySelector.ONE_ENTITY- A single entity, which returns aEntityobject.EntitySelector.MANY_ENTITIES- A collection of many entities, which returns aCollection<Entity>object.EntitySelector.ONE_PLAYER- A single player, which returns aPlayerobject.EntitySelector.MANY_PLAYERS- A collection of players, which returns aCollection<Player>object.
The return type is the type to be cast when retrieved from the Object[] args in the command declaration.
Example - Remove entities command
Say we want a command to remove certain types of entities. Typically, this would be implemented using a simple command like:
/remove <player>
/remove <mob type>
/remove <radius>
Instead, we can combine all of these into one by using the EntitySelectorArgument. We want to be able to target multiple entities at a time, so we want to use the EntitySelector.MANY_ENTITIES value in our constructor. We can simply retrieve the Collection<Entity> from this argument and iteratively remove each entity:
//LinkedHashMap to store arguments for the command
LinkedHashMap<String, Argument> arguments = new LinkedHashMap<>();

//Using a collective entity selector to select multiple entities
arguments.put("entities", new EntitySelectorArgument(EntitySelector.MANY_ENTITIES));

new CommandAPICommand("remove")
    .withArguments(arguments)
    .executes((sender, args) -> {
        //Parse the argument as a collection of entities (as stated above in the documentation)
        @SuppressWarnings("unchecked")
        Collection<Entity> entities = (Collection<Entity>) args[0];

        sender.sendMessage("Removed " + entities.size() + " entities");
        for(Entity e : entities) {
            e.remove();
        }
    })
    .register();
We could then use this to target specific entities, for example:
- To remove all cows:
/remove @e[type=cow] - To remove the 10 furthest pigs from the command sender:
/remove @e[type=pig,limit=10,sort=furthest]
Player argument
The PlayerArgument class is very similar (almost identical) to EntitySelectorArgument, with the EntitySelector ONE_PLAYER. It also allows you to select a player based on their UUID.
Developer's Note:
I've not tested the
PlayerArgumentenough to recommend using it over theEntitySelectorArgument(EntitySelector.ONE_PLAYER). There may be other advantages to using this than the regular EntitySelectorArgument, but as of writing this documentation, I know not of the advantages nor disadvantages to using this argument type. Internally, thePlayerArgumentuses theGameProfileclass from Mojang's authlib, which may be able to retrieve offline players (untested).(Of course, if anyone is able to confirm any major differences between the
PlayerArgumentand theEntitySelectorArgument(EntitySelector.ONE_PLAYER), I would be more than happy to include your findings in the documentation. If so, feel free to make a documentation amendment here.)
Entity type argument
The EntityTypeArgument class is used to retrieve a type of entity as defined in the EntityType enum. In other words, this is an entity type, for example a pig or a zombie.
Example - Spawning entities
Say we want a command to spawn a specific type of entity, similar to the /summon command in Vanilla Minecraft, with the addition of specifying how many entities to spawn. We want to create a command of the following form:
/spawnmob <entity> <amount>
Since we're trying to specify an entity type, we will use the EntityTypeArgument as our argument type for <entity>. We combine this with the IntegerArgument class with a specified range of \( 1 \le \textit{amount} \le 100 \):
LinkedHashMap<String, Argument> arguments = new LinkedHashMap<>();

arguments.put("entity", new EntityTypeArgument());
arguments.put("amount", new IntegerArgument(1, 100)); //Prevent spawning too many entities

new CommandAPICommand("spawnmob")
    .withArguments(arguments)
    .executesPlayer((Player player, Object[] args) -> {
        for(int i = 0; i < (int) args[1]; i++) {
            player.getWorld().spawnEntity(player.getLocation(), (EntityType) args[0]);
        }
    })
    .register();
Note how in this example above, we have to explicitly state Player player, Object[] args. This is due to a limitation of Java's type inference system which is discussed here.
Scoreboard arguments
Scoreboard arguments
The CommandAPI uses two classes to provide information about a scoreboard:
- The
ScoreHolderArgumentclass represents score holder - a player's name or an entity's UUID that has scores in an objective. This is described in more detail on the Minecraft Wiki. - The
ScoreboardSlotArgumentclass represents a display slot (sidebar, list or belowName) as well as the team color if the display is the sidebar. This is described in more detail on the Minecraft Wiki.
Score holder argument
The score holder argument can accept either a single entity or a collection of multiple entities. In order to specify which one to use, you must provide a ScoreHolderType enum value to the ScoreHolderArgument constructor, which is either ScoreHolderType.SINGLE or ScoreHolderType.MULTIPLE:
new ScoreHolderArgument(ScoreHolderType.SINGLE);
new ScoreHolderArgument(ScoreHolderType.MULTIPLE);
Depending on which constructor is used, the cast type changes. If you use a ScoreHolderType.SINGLE, the argument must be casted to a String. Otherwise, if you use ScoreHolderType.MULTIPLE, the argument must be casted to a Collection<String>.
Example - Rewarding players with scoreboard objectives
Say we want to reward all players that fit a certain criteria. We want a command with the following structure:
/reward <players>
Since we could have multiple players that fit a certain criterion, we want to use ScoreHolderType.MULTIPLE as the parameter for the argument's constructor.
To give this example a bit more context, let's say we want to reward all players that have died less than 10 times in the server. To do this, we will use the following command:
/reward @e[type=player,scores={deaths=..9}]
Note how we use ..9 to represent 9 or less deaths (since ranges are inclusive). Also note how we restrict our input to players via the command using type=player. We can now implement our command:
LinkedHashMap<String, Argument> arguments = new LinkedHashMap<>();
//We want multiple players, so we use ScoreHolderType.MULTIPLE in the constructor
arguments.put("players", new ScoreHolderArgument(ScoreHolderType.MULTIPLE));

new CommandAPICommand("reward")
    .withArguments(arguments)
    .executes((sender, args) -> {
        //Get player names by casting to Collection<String>
        @SuppressWarnings("unchecked")
        Collection<String> players = (Collection<String>) args[0];

        for(String playerName : players) {
            Bukkit.getPlayer(playerName).getInventory().addItem(new ItemStack(Material.DIAMOND, 3));
        }
    })
    .register();
Developer's Note:
In the example above, we have our user use the
@e[type=player]entity selector to restrict theCollection<String>so it only returns player names, which allows us to useBukkit.getPlayer(playerName). In practice, we cannot guarantee that such a selector will be used, so we could update the code to accept both entities and players. For example, we can differentiate between players and entities by using theUUID.fromString(String)method:Collection<String> entitiesAndPlayers = (Collection<String>) args[0]; for(String str : entitiesAndPlayers) { try { UUID uuid = UUID.fromString(str); //Is a UUID, so it must by an entity Bukkit.getEntity(uuid); } catch(IllegalArgumentException exception) { //Not a UUID, so it must be a player name Bukkit.getPlayer(str); } }
Scoreboard slot argument
The ScoreboardSlotArgument represents where scoreboard information is displayed. Since the Bukkit scoreboard DisplaySlot is not able to represent the case where team colors are provided, the CommandAPI uses the ScoreboardSlot wrapper class as the representation of the ScoreboardSlotArgument.
ScoreboardSlot wrapper
The ScoreboardSlot wrapper class has 3 methods:
class ScoreboardSlot {
    public DisplaySlot getDisplaySlot();
    public ChatColor getTeamColor();
    public boolean hasTeamColor();
}
The getDisplaySlot() method returns the display slot that was chosen. If the display slot is DisplaySlot.SIDEBAR and hasTeamColor() returns true, then it is possible to use getTeamColor() to get the team color provided.
Example - Clearing objectives in a scoreboard slot
Say we want to clear all objectives in a specific scoreboard slot. In this example, we will use the main server scoreboard, which is accessed using Bukkit.getScoreboardManager.getMainScoreboard(). We want a command with the following structure:
/clearobjectives <slot>
We implement this simply by using the ScoreboardSlotArgument as our argument, and then we can clear the slot using the scoreboard clearSlot(DisplaySlot) method.
LinkedHashMap<String, Argument> arguments = new LinkedHashMap<>();
arguments.put("slot", new ScoreboardSlotArgument());

new CommandAPICommand("clearobjectives")
    .withArguments(arguments)
    .executes((sender, args) -> {
		Scoreboard scoreboard = Bukkit.getScoreboardManager().getMainScoreboard();
        DisplaySlot slot = ((ScoreboardSlot) args[0]).getDisplaySlot();
        scoreboard.clearSlot(slot);
    })
    .register();
Objective arguments
In the CommandAPI, objectives are split into two classes:
- The
ObjectiveArgumentclass, which represents objectives as a whole - The
ObjectiveCriteriaArgumentclass, which represents objective criteria
Objective argument
The objective argument refers to a single scoreboard objective. Unconventionally, the ObjectiveArgument must be cast to String due to implementation limitations.
Developer's Note:
The two classes
ObjectiveArgumentandTeamArgumentmust both be cast toString, as opposed toObjectiveandTeamrespectively. This is due to the fact that commands are typically registered in theonLoad()method during a plugin's initialization. At this point in the server start-up sequence, the main server scoreboard is not initialized, so it cannot be used.
Example - Move objective to sidebar
As an example, let's create a command to move an objective to a player's sidebar. To do this, we will use the following command structure:
/sidebar <objective>
Given that an objective has to be casted to a String, we have to find a way to convert it from its name to a Bukkit Objective object. We can do that by using the getObjective(String) method from a Bukkit Scoreboard:
LinkedHashMap<String, Argument> arguments = new LinkedHashMap<>();
arguments.put("objective", new ObjectiveArgument());

new CommandAPICommand("sidebar")
    .withArguments(arguments)
    .executes((sender, args) -> {
        //The ObjectArgument must be casted to a String
        String objectiveName = (String) args[0];

        //An objective name can be turned into an Objective using getObjective(String)
        Objective objective = Bukkit.getScoreboardManager().getMainScoreboard().getObjective(objectiveName);

        //Set display slot
        objective.setDisplaySlot(DisplaySlot.SIDEBAR);
    })
    .register();
Objective criteria argument
The ObjectiveCriteriaArgument is fairly straight forward - it represents the criteria for an objective. Similar to Bukkit, the objective criteria is simply represented as a String, so it must be casted to a String when being used.
Example - Unregister all objectives by criteria
Say we wanted to create a command to unregister all objectives based on a given criteria. Let's create a command with the following form:
/unregisterall <objective critera>
To do this, we're going to take advantage of Bukkit's Scoreboard.getObjectivesByCriteria(String) method
LinkedHashMap<String, Argument> arguments = new LinkedHashMap<>();
arguments.put("objective criteria", new ObjectiveCriteriaArgument());

new CommandAPICommand("unregisterall")
    .withArguments(arguments)
    .executes((sender, args) -> {
        String objectiveCriteria = (String) args[0];
        Set<Objective> objectives = Bukkit.getScoreboardManager().getMainScoreboard().getObjectivesByCriteria(objectiveCriteria);

        //Unregister the objectives
        for(Objective objective : objectives) {
            objective.unregister();
        }
    })
    .register();
Team arguments
The TeamArgument class interacts with the Minecraft scoreboard and represents a team. Similar to the ObjectiveArgument class, the TeamArgument class must be casted to a String.
Example - Toggling friendly fire in a team
Let's say we want to create a command to toggle the state of friendly fire in a team. We want a command of the following form
/togglepvp <team>
To do this, given a team we want to use the setAllowFriendlyFire(boolean) function. As with the ObjectiveArgument, we must convert the String into a Team object.
LinkedHashMap<String, Argument> arguments = new LinkedHashMap<>();
arguments.put("team", new TeamArgument());

new CommandAPICommand("togglepvp")
    .withArguments(arguments)
    .executes((sender, args) -> {
        //The TeamArgument must be casted to a String
        String teamName = (String) args[0];

        //A team name can be turned into a Team using getTeam(String)
        Team team = Bukkit.getScoreboardManager().getMainScoreboard().getTeam(teamName);

        //Toggle pvp
        team.setAllowFriendlyFire(team.allowFriendlyFire());
    })
    .register();
Miscellaneous arguments
Advancement arguments
The AdvancementArgument class represents in-game advancements. As expected, the AdvancementArgument can be casted to Bukkit's Advancement class.
Example - Awarding a player an advancement
Say we want to award a player an advancement. First, we need the structure of our command:
/award <player> <advancement>
Since we require a player, we will use the PlayerArgument for this example. Given a player, we can simply get the AdvancementProgress for that player, and then award the criteria required to fully complete the provided advancement.
LinkedHashMap<String, Argument> arguments = new LinkedHashMap<>();
arguments.put("player", new PlayerArgument());
arguments.put("advancement", new AdvancementArgument());

new CommandAPICommand("award")
    .withArguments(arguments)
    .executes((sender, args) -> {
        Player target = (Player) args[0];
        Advancement advancement = (Advancement) args[1];

        //Award all criteria for the advancement
        AdvancementProgress progress = target.getAdvancementProgress(advancement);
        for(String criteria : advancement.getCriteria()) {
            progress.awardCriteria(criteria);
        }
    })
    .register();
Biome arguments
In Minecraft 1.16, they added the ability to refer to in-game biomes. The CommandAPI implements this using the BiomeArgument. As expected, this returns Bukkit's Biome enum when used.
Note:
The
BiomeArgumentis only supported in Minecraft versions 1.16 and later. Attempting to use theBiomeArgumenton an incompatible version of Minecraft will throw aBiomeArgumentException.
Example - Setting the biome of a chunk
Say you want to set the biome of the current chunk that a player is in. We can do this using the World.setBiome(x, y, z, biome) method for a given world. We will use this command structure to set the biome of our current chunk:
/setbiome <biome>
And we can set the biome of the current chunk as expected:
LinkedHashMap<String, Argument> arguments = new LinkedHashMap<>();
arguments.put("biome", new BiomeArgument());

new CommandAPICommand("setbiome")
	.withArguments(arguments)
	.executesPlayer((player, args) -> {
		Biome biome = (Biome) args[0];

		Chunk chunk = player.getLocation().getChunk();
		player.getWorld().setBiome(chunk.getX(), player.getLocation().getBlockY(), chunk.getZ(), biome);
	})
	.register();
Enchantment argument
The EnchantmentArgument class lets users input a specific enchantment. As you would expect, the cast type is Bukkit's Enchantment class.
Example - Giving a player an enchantment on their current item
Say we want to give a player an enchantment on the item that the player is currently holding. We will use the following command structure:
/enchantitem <enchantment> <level>
Since most enchantment levels range between 1 and 5, we will also make use of the IntegerArgument to restrict the level of the enchantment by usng its range constructor.
LinkedHashMap<String, Argument> arguments = new LinkedHashMap<>();
arguments.put("enchantment", new EnchantmentArgument());
arguments.put("level", new IntegerArgument(1, 5));

new CommandAPICommand("enchantitem")
    .withArguments(arguments)
    .executesPlayer((player, args) -> {
		Enchantment enchantment = (Enchantment) args[0];
		int level = (int) args[1];

		//Add the enchantment
		player.getInventory().getItemInMainHand().addEnchantment(enchantment, level);
    })
    .register();
Environment arguments
The EnvironmentArgument class allows a command sender to refer to a specific world environment, declared in Bukkit's World.Environment class. This includes the following three environments: NORMAL, NETHER and THE_END.
Note:
The
EnvironmentArgumentis only supported in Minecraft versions 1.13.1 and later, meaning it will not work on Minecraft 1.13. This is due to fact that Minecraft added the environment argument in 1.13.1. Attempting to use theEnvironmentArgumenton Minecraft 1.13 will throw anEnvironmentArgumentException.
Example - Creating a new world
Say we want to create a new world on our Minecraft server. To do this, we need to know the name of the world, and the type (i.e. overworld, nether or the end). As such, we want to create a command with the following structure:
/createworld <worldname> <type>
Using the world name and the environment of the world, we can use Bukkit's WorldCreator to create a new world that matches our provided specifications:
// Declare our arguments
LinkedHashMap<String, Argument> arguments = new LinkedHashMap<>();
arguments.put("worldname", new StringArgument());
arguments.put("type", new EnvironmentArgument());

new CommandAPICommand("createworld")
    .withArguments(arguments)
    .executes((sender, args) -> {
        String worldName = (String) args[0];
        Environment environment = (Environment) args[1];

        // Create a new world with the specific world name and environment
        Bukkit.getServer().createWorld(new WorldCreator(worldName).environment(environment));
        sender.sendMessage("World created!");
    })
    .register();
Itemstack arguments
The ItemStackArgument class represents in-game items. As expected, this should be casted to Bukkit's ItemStack object.
Example - Giving a player an itemstack
Say we want to create a command that gives you items. For this command, we will use the following structure:
/item <itemstack>
With this structure, we can easily create our command:
// Declare our arguments
LinkedHashMap<String, Argument> arguments = new LinkedHashMap<>();
arguments.put("itemstack", new ItemStackArgument());

new CommandAPICommand("item")
    .withArguments(arguments)
    .executesPlayer((player, args) -> {
        player.getInventory().addItem((ItemStack) args[0]);
    })
    .register();
LootTable argument
The LootTableArgument class can be used to get a Bukkit LootTable object.
Example - Filling an inventory with loot table contents
LinkedHashMap<String, Argument> arguments = new LinkedHashMap<>();
arguments.put("loottable", new LootTableArgument());

new CommandAPICommand("giveloottable")
    .withArguments(arguments)
    .executesPlayer((player, args) -> {
        LootTable lootTable = (LootTable) args[0];

    	LootContext context = /* Some generated LootContext relating to the lootTable*/
		lootTable.fillInventory(player.getInventory(), new Random(), context);
    })
    .register();
Developer's Note:
Honestly, I've not managed to get a successful example of using a
LootTablein practice, due to being unable to generate a suitableLootContext. If you believe you can supply a suitable example for this page, feel free to send an example on the CommandAPI issues page.
MathOperation arguments
The CommandAPI's MathOperationArgument is used to represent the Minecraft scoreboard arithmetic operation to alter scoreboard scores. Since there is no default representation in the Bukkit API, the CommandAPI provides the MathOperation class to represent each operation:
| Symbol (in Minecraft) | MathOperation enum value |
|---|---|
| \(+=\) | MathOperation.ADD |
| \(-=\) | MathOperation.SUBTRACT |
| \(*=\) | MathOperation.MULTIPLY |
| \(/=\) | MathOperation.DIVIDE |
| \(\%=\) | MathOperation.MOD |
| \(=\) | MathOperation.ASSIGN |
| \(<\) | MathOperation.MIN |
| \(>\) | MathOperation.MAX |
| \(><\) | MathOperation.SWAP |
The MathOperationArgument also has two methods:
public int apply(int val1, int val2);
public float apply(float val1, float val2);
These methods are used to provide a basic implementation of these math operations on a given input. Given the values val1 and val2, these are the operation that the apply(val1, val2) method performs:
| MathOperation enum value | Result |
|---|---|
MathOperation.ADD | val1 + val2 |
MathOperation.SUBTRACT | val1 - val2 |
MathOperation.MULTIPLY | val1 * val2 |
MathOperation.DIVIDE | val1 / val2 |
MathOperation.MOD | val1 % val2 |
MathOperation.ASSIGN | val2 |
MathOperation.MIN | Math.min(val1, val2) |
MathOperation.MAX | Math.max(val1, val2) |
MathOperation.SWAP | val2 |
Example - Changing a player's level
Say we wanted to create a player's level. Typically, this is implemented in the following manner:
/xp set <player> <level>
/xp add <player> <levels>
Using the MathOperationArgument, we can extend the functionality of adding and setting a player's level by allowing the user to choose what operation they desire. To do this, we'll use the following structure:
/changelevel <player> <operation> <value>
As with any command, we declare our arguments, cast them properly and then we write our main code. In this example, we use the apply(int, int) method from our MathOperation to calculate the player's new level.
LinkedHashMap<String, Argument> arguments = new LinkedHashMap<>();
arguments.put("player", new PlayerArgument());
arguments.put("operation", new MathOperationArgument());
arguments.put("value", new IntegerArgument());

new CommandAPICommand("changelevel")
    .withArguments(arguments)
    .executes((sender, args) -> {
        Player target = (Player) args[0];
        MathOperation op = (MathOperation) args[1];
        int value = (int) args[2];

        target.setLevel(op.apply(target.getLevel(), value));
    })
	.register();
There are various applications for the changelevel command based on what the user inputs. For example:
-
To set the player Notch to level 10:
/changelevel Notch = 10 -
To double the player Notch's level:
/changelevel Notch *= 2 -
To set the player Notch's level to 20, or keep it as their current level if it is higher than 20:
/changelevel Notch > 20
Particle arguments
The ParticleArgument class represents Minecraft particles. As expected, this is casted to the Bukkit Particle class.
Example - Show particles at a player's location
Say we wanted to have a command that displayed particles at a player's location. We will use the following command structure:
/showparticle <particle>
With this, we can simply spawn the particle using the World.spawnParticle(Particle, Location, int) method:
LinkedHashMap<String, Argument> arguments = new LinkedHashMap<>();
arguments.put("particle", new ParticleArgument());

new CommandAPICommand("showparticle")
    .withArguments(arguments)
    .executesPlayer((player, args) -> {
        player.getWorld().spawnParticle((Particle) args[0], player.getLocation(), 1);
    })
    .register();
Potion effect arguments
The PotionEffectArgument class represents Minecraft potion effects. When used, this argument is casted to Bukkit's PotionEffectType class.
Example - Giving a player a potion effect
Say we wanted to have a command that gives a player a potion effect. For this command, we'll use the following structure:
/potion <target> <potion> <duration> <strength>
In this example, we utilize some of the other arguments that we've described earlier, such as the PlayerArgument and TimeArgument. Since duration for the PotionEffect constructor is in ticks, this is perfectly fit for the TimeArgument, which is represented in ticks.
//Declare our arguments
LinkedHashMap<String, Argument> arguments = new LinkedHashMap<>();
arguments.put("target", new PlayerArgument());
arguments.put("potion", new PotionEffectArgument());
arguments.put("duration", new TimeArgument());
arguments.put("strength", new IntegerArgument());

new CommandAPICommand("potion")
    .withArguments(arguments)
    .executes((sender, args) -> {
        Player target = (Player) args[0];
        PotionEffectType potion = (PotionEffectType) args[1];
        int duration = (int) args[2];
        int strength = (int) args[3];

        //Add the potion effect to the target player
        target.addPotionEffect(new PotionEffect(potion, duration, strength));
    })
    .register();
Recipe arguments
The RecipeArgument class lets you retrieve Bukkit's Recipe object. Unlike the other arguments, this argument has a slightly different implementation for Minecraft 1.15+.
Developer's Note:
In Minecraft 1.15 and onwards, Bukkit now has the
ComplexRecipeclass. This class is a subclass of the typicalRecipeclass, so casting still works when casting toRecipe. The only major difference is theComplexRecipeclass also inherits theKeyedinterface, allowing you to access itsNamespacedKey. This is used to grant the recipe to players. (This is shown in the second example below).
Example - Giving a player the result of a recipe
Say we want to give youself the result of a specific recipe. Since Bukkit's Recipe class contains the getResult() method, we will use that in our example. We want to create the following command:
/giverecipe <recipe>
As such, we easily implement it by specifying the RecipeArgument, casting it and adding it to the player's inventory:
LinkedHashMap<String, Argument> arguments = new LinkedHashMap<>();
arguments.put("recipe", new RecipeArgument());

new CommandAPICommand("giverecipe")
    .withArguments(arguments)
    .executesPlayer((player, args) -> {
        Recipe recipe = (Recipe) args[0];
    	player.getInventory().addItem(recipe.getResult());
    })
    .register();
Example - Unlocking a recipe for a player (1.15+ only)
Since 1.15 has the ComplexRecipe class, we will take advantage of this to unlock a recipe for a player. For this command, we'll use the following structure:
/unlockrecipe <player> <recipe>
Since the discoverRecipe(NamespacedKey) method for a player requires a NamespacedKey, we have to ensure that this recipe is of type ComplexRecipe. This is simply done by using instanceof. If this is the case, then we can unlock the recipe for the player. Otherwise, we cannot, so we fail gracefully using the CommandAPI.fail(String) method;
LinkedHashMap<String, Argument> arguments = new LinkedHashMap<>();
arguments.put("player", new PlayerArgument());
arguments.put("recipe", new RecipeArgument());

new CommandAPICommand("unlockrecipe")
    .withArguments(arguments)
    .executes((sender, args) -> {
        Player target = (Player) args[0];
        Recipe recipe = (Recipe) args[1];

        //Check if we're running 1.15+
        if(recipe instanceof ComplexRecipe) {
            ComplexRecipe complexRecipe = (ComplexRecipe) recipe;
            target.discoverRecipe(complexRecipe.getKey());
        } else {
            //Error here, can't unlock recipe for player
            CommandAPI.fail("Cannot unlock recipe for player (Are you using version 1.15 or above?)");
        }
    })
    .register();
Sound arguments
The SoundArgument class allows a command sender to retrieve the Bukkit Sound object to represent in-game sound effects (such as mob sounds or ambient sound effects), as well as in-game music.
Example - Playing sound to yourself
Say we want a simple command that plays a specific sound at your location. To do this, we will make the following command:
/sound <sound>
This command simply plays the provided sound to the current player:
LinkedHashMap<String, Argument> arguments = new LinkedHashMap<>();
arguments.put("sound", new SoundArgument());

new CommandAPICommand("sound")
    .withArguments(arguments)
    .executesPlayer((player, args) -> {
        player.getWorld().playSound(player.getLocation(), (Sound) args[0], 100.0f, 1.0f);
    })
    .register();
Time arguments
The TimeArgument class represents in-game time, in the number of in-game ticks. This allows command senders to specify a certain number of ticks in a simpler way, by including the characters d to specify the numbers of days, s to specify the number of seconds or t to specify a number of ticks.
The CommandAPI converts the inputs provided by the command sender into a number of ticks as an integer.
Note:
The
TimeArgumentis only supported in Minecraft versions 1.14 and later, meaning it will not work on Minecraft versions 1.13, 1.13.1 or 1.13.2. This is due to the fact that Minecraft added the time argument in 1.14. Attempting to use theTimeArgumenton an incompatible version will throw aTimeArgumentException.
Developer's Note:
The
TimeArgumentprovides inputs such as2d(2 in-game days),10s(10 seconds) and20t(20 ticks), but does not let you combine them, such as2d10s.
Example - Displaying a server-wide announcement
Say we have a command bigmsg that displays a title message to all players for a certain duration:
/bigmsg <duration> <message>
//Declare our arguments
LinkedHashMap<String, Argument> arguments = new LinkedHashMap<>();
arguments.put("duration", new TimeArgument());
arguments.put("message", new GreedyStringArgument());

new CommandAPICommand("bigmsg")
    .withArguments(arguments)
    .executes((sender, args) -> {
        //Duration in ticks
        int duration = (int) args[0];
        String message = (String) args[1];

        for(Player player : Bukkit.getOnlinePlayers()) {
            //Display the message to all players, with the default fade in/out times (10 and 20).
            player.sendTitle(message, "", 10, duration, 20);
        }
    })
    .register();
NBT arguments
The CommandAPI includes support for NBT compounds by using the NBT API by tr7zw. To use NBT, use the NBTCompoundArgument and simply cast the argument to an NBTContainer.
Since this argument depends on the NBT API, if this is used and the NBT API is not available on the server, an NBTAPINotFoundException will be thrown.
Example - ???
LinkedHashMap<String, Argument> arguments = new LinkedHashMap<>();
arguments.put("nbt", new NBTCompoundArgument());

new CommandAPICommand("award")
    .withArguments(arguments)
    .executes((sender, args) -> {
        NBTContainer nbt = (NBTContainer) args[0];

        //Do something with "nbt" here...
    })
    .register();
Developer's Note:
I haven't personally explored much with using this argument, so this example isn't great. If you believe you can supply a suitable example for this page, feel free to send an example on the CommandAPI issues page.
Literal arguments
Literal arguments are used to represent "forced options" for a command. For instance, take Minecraft's /gamemode command. The syntax consists of the following:
/gamemode <mode> [player]
It consists of a gamemode, followed by an optional player argument. The list of gamemodes are as follows:
/gamemode survival
/gamemode creative
/gamemode adventure
/gamemode spectator
Unlike regular commands (as those implemented by Bukkit for example), these four options are "hardcoded" - they're not "suggestions". The user can only enter one of these four examples, no other values are allowed.
Literal arguments vs regular arguments
Unlike regular arguments that are shown in this chapter, the literal argument is technically not an argument. Due to this fact, the literal argument is not present in the args[] for the command declaration.
Example - Literal arguments and regular arguments
To illustrate the behavior of literal arguments, we create a command of the following form:
/mycommand <literal> <text>
As an example, let's declare the literal "hello" as a valid literal for this command. When we retrieve the result from args[0], it returns the value of the TextArgument, as opposed to the literal "hello":
LinkedHashMap<String, Argument> arguments = new LinkedHashMap<>();
arguments.put("literal", new LiteralArgument("hello"));
arguments.put("text", new TextArgument());

new CommandAPICommand("mycommand")
    .withArguments(arguments)
    .executes((sender, args) -> {
        // This gives the variable "text" the contents of the TextArgument, and not the literal "hello"
		String text = (String) args[0];
    })
    .register();
If I were to run the following command:
/mycommand hello goodbye
The value of text in the code above would be "goodbye".
Example - Gamemode command using literal arguments
This is a demonstration of how you could create a command similar to Minecraft's /gamemode command by using literal arguments. To do this, we are effectively registering 4 separate commands, each called /gamemode, but with different literal arguments.
//Create a map of gamemode names to their respective objects
HashMap<String, GameMode> gamemodes = new HashMap<>();
gamemodes.put("adventure", GameMode.ADVENTURE);
gamemodes.put("creative", GameMode.CREATIVE);
gamemodes.put("spectator", GameMode.SPECTATOR);
gamemodes.put("survival", GameMode.SURVIVAL);

//Iterate over the map
for(String key : gamemodes.keySet()) {

    //Create our arguments as usual, using the LiteralArgument for the name of the gamemode
	LinkedHashMap<String, Argument> arguments = new LinkedHashMap<>();
	arguments.put(key, new LiteralArgument(key));

    //Register the command as usual
    new CommandAPICommand("changegamemode")
        .withArguments(arguments)
        .executesPlayer((player, args) -> {
            //Retrieve the object from the map via the key and NOT the args[]
	        player.setGameMode(gamemodes.get(key));
        })
        .register();
}
Note how, since we don't have access to the literal from args, we must access the provided gamemode from elsewhere.
Literal argument warnings
Literal arguments require a string in the constructor. If the literal is an empty String or is null, the CommandAPI will throw a BadLiteralException.
Because literal arguments are "hardcoded", each literal is effectively mapped to a single command. This is shown when using the configuration option create-dispatcher-json: true which shows the JSON result of registered commands. For instance, take the /defaultgamemode command:
"defaultgamemode": {
    "type": "literal",
    "children": {
        "adventure": {
            "type": "literal",
            "executable": true
        },
        "creative": {
            "type": "literal",
            "executable": true
        },
        "spectator": {
            "type": "literal",
            "executable": true
        },
        "survival": {
            "type": "literal",
            "executable": true
        }
    }
},
Each option produces a new "command" in the tree of commands. This means that having exceptionally large lists of literals, or nested literals (e.g. /command <literal1> <literal2>) can cause very large trees which cannot be sent to the clients (it can cause clients to crash).
Developer's Note:
Take care when using literal arguments. If your list of arguments is exceptionally large, or contains many nested arguments, the server may be unable to send the command information to the client. If many command argument choices are required, consider using a
StringArgumentand using.overrideSuggestions()to create your own list of required arguments.
Custom arguments
Custom arguments are arguably the most powerful argument that the CommandAPI offers. This argument is used to represent any String, or Minecraft key (Something of the form String:String, such as minecraft:diamond). They basically represent StringArgument with overrideable suggestions and a built-in parser for any object of your choice. They are designed to be used for multiple commands - you define the argument once and can use it wherever you want when declaring commands.
The CustomArgument<T> has two constructors, declared as follows:
public CustomArgument(CustomArgumentFunction<T> parser);
public CustomArgument(CustomArgumentFunction<T> parser, boolean keyed);
The first argument is the CustomArgumentFunction, which is a lambda that takes in a String and returns some custom object of type T. The first constructor will construct a CustomArgument which uses the StringArgument as a base (thus, only simple strings). The second argument has the field keyed. When this field is set to true, the CustomArgument will use a Minecraft key as a base, allowing you to use Minecraft keys as input.
Developer's Note:
I may have complicated this too much, so let me clarify what I mean. The
CustomArgumentconstructor is of the following forms:CustomArgument((String) -> { ... return T; }); CustomArgument((String) -> { ... return T; }, boolean keyed);Both constructors take in a String as input and return
T. When enablingkeyed, it allows the input to be of the form of a Minecraft key, but doesn't change the input type.
The custom argument requires the type of the target object that the custom argument will return when parsing the arguments for a command. For instance, if you have a CustomArgument<Player>, then when parsing the arguments for the command, you would cast it to a Player object.
Example - World argument
Say we want to create an argument to represents the list of available worlds on the server. We basically want to have an argument which always returns a Bukkit World object as the result. Here, we create a method worldArgument() that returns our custom argument that returns a World. First, we retrieve our String[] of world names to be used for our suggestions. We then write our custom argument that creates a World object from the input (in this case, we simply convert the String to a World using Bukkit.getWorld(String)). We perform error handling before returning our result:
//Function that returns our custom argument
public Argument worldArgument() {

    //List of worlds on the server, as Strings
    String[] worlds = Bukkit.getWorlds().stream().map(World::getName).toArray(String[]::new);

    //Construct our CustomArgument that takes in a String input and returns a World object
    return new CustomArgument<World>((input) -> {
        //Parse the world from our input
        World world = Bukkit.getWorld(input);

        if(world == null) {
            throw new CustomArgumentException(new MessageBuilder("Unknown world: ").appendArgInput());
        } else {
            return world;
        }
    }).overrideSuggestions(worlds);
}
In our error handling step, we check if the world is equal to null (since the Bukkit.getWorld(String) is @Nullable). To handle this case, we throw a CustomArgumentException with an error from a MessageBuilder. The CustomArgumentException has two constructors, so a message builder isn't required each time:
new CustomArgumentException(String message);
new CustomArgumentException(MessageBuilder message);
We can use our custom argument like any other argument. Say we wanted to write a command to teleport to a specific world. We will create a command of the following structure:
/tpworld <world>
Since we have defined the method worldArgument() which automatically generates our argument, we can use it as follows:
LinkedHashMap<String, ArgumentType> arguments = new LinkedHashMap<>();
arguments.put("world", worldArgument());

new CommandAPICommand("tpworld")
    .withArguments(arguments)
    .executesPlayer((player, args) -> {
        player.teleport(Bukkit.getWorld((World) args[0])).getSpawnLocation());
    })
    .register();
By using a CustomArgument (as opposed to a simple StringArgument and overriding its suggestions), we are able to provide a much more powerful form of error handling (automatically handled inside the argument), and we can reuse this argument for other commands.
Message Builders
The MessageBuilder class is a class to easily create messages to describe errors when a sender sends a command which does not meet the expected syntax for an argument. It acts in a similar way to a StringBuilder, where you can append content to the end of a String.
The following methods are as follows:
| Method | Description |
|---|---|
appendArgInput() | Appends the argument that failed that the sender submitted to the end of the builder. E.g. /foo bar will append bar |
appendFullInput() | Appends the full command that a sender submitted to the end of the builder. E.g. /foo bar will append foo bar |
appendHere() | Appends the text <--[HERE] to the end of the builder |
append(Object) | Appends an object to the end of the builder |
Example - Message builder for invalid objective argument
To create a MessageBuilder, simply call its constructor and use whatever methods as you see fit. Unlike a StringBuilder, you don't have to "build" it when you're done - the CommandAPI does that automatically:
new MessageBuilder("Unknown world: /").appendFullInput().appendHere();
Functions
The CommandAPI has support to use Minecraft's functions within your plugins. This is handled by using a class provided by the CommandAPI called FunctionWrapper, which allows you to execute functions. The CommandAPI also provides support to let you run your own commands within Minecraft function files.
Using custom commands in functions
In order to use a command from your plugin in a .mcfunction file, you must register your command in your plugin's onLoad() method, instead of the onEnable() method. Failure to do so will not allow the command to be registered for Minecraft functions, causing the function file to fail to load during the server startup phase.
Developer's Note:
In short, if you want to register a command which can be used in Minecraft functions, register it in your plugin's
onLoad()method.
Example - Registering command for use in a function
Say we have a command /killall that simply kills all entities in all worlds on the server. If we were to register this in our onLoad() method, this would allow us to use the /killall command in Minecraft functions and tags.
public class Main extends JavaPlugin {

	@Override
	public void onLoad() {
		//Commands which will be used in Minecraft functions are registered here

        new CommandAPICommand("killall")
            .executes(sender, args) -> {
                //Kills all enemies in all worlds
                Bukkit.getWorlds().forEach(w -> w.getLivingEntities().forEach(e -> e.setHealth(0)));
        	})
            .register();
	}

    @Override
    public void onEnable() {
        //Register all other commands here
    }
}
Setting up functions & tags
Developer's Note:
Most developers can completely skip this section. This is for those that are unfamiliar with functions and tags and is less about how the CommandAPI works.
This section explains how functions are declared and set up for use in a Minecraft server. This is ideal for server owners who've never set up functions, or developers (like the Command API's creator) that has no idea how to set this sort of thing up.
Creating functions
Functions are text files (with the .mcfunction extension) which contains lists of functions which are executed one after another. Each line of the file is a valid Minecraft command. Say we have text.mcfunction:
killall
say Killed all living entities on the server
This will run the custom command killall (as declared in Chapter 6 - Functions & Tags), and then broadcast a message to all players stating that all entities were killed.
Creating tags
Tags are json files which contain a list of functions. Tags let you run multiple functions at a time. Say we have a tag called mytag.json:
{
    "values": [
    	"mycustomnamespace:test",
    	"mycustomnamespace:test2"
    ]
}
This will run the function test and the function test2, which are in the namespace mycustomnamespace.
Namespaces & where to place everything
The following hierarchy explains where functions and tags go. In this diagram, the two functions test and test2 are in a directory called functions. There is also a tag called mytag which is placed in the tags directory under functions. These are all under the namespace called mycustomnamespace
server/
├── world/
│   ├── advancements/
│   ├── data/
│   ├── datapacks/
│   │   └── bukkit/
│   │       ├── pack.mcmeta
│   │       └── data/
│   │           └── mycustomnamespace/
│   │               ├── functions/
│   │               │   ├── test.mcfunction
│   │               │   └── test2.mcfunction
│   │               └── tags/
│   │                   └── functions/
│   │                       └── mytag.json
│   └── ...
├── world_nether/
├── world_the_end/
├── ...
└── spigot.jar
To execute the test function, you would run the following command:
/function mycustomnamespace:test
To execute the mytag tag, you would run the following command:
/function #mycustomnamespace:mytag
The FunctionWrapper
The CommandAPI includes the FunctionWrapper class which is a wrapper for Minecraft's functions. It allows you to execute the commands that are represented by the respective .mcfunction file. There most important thing to note with the FunctionWrapper, and that it does not "store" the functions inside it, instead it just stores what the function does. In other words, you cannot "extract" the list of commands from a FunctionWrapper object.
FunctionWrapper methods
The FunctionWrapper class consists of two methods:
| Method | Result on execution |
|---|---|
run() | Executes the Minecraft function |
runAs(Entity) | Executes the Minecraft function as a specific Entity |
The FunctionWrapper also implements the Keyed interface, allowing you to retrieve the NamespacedKey for this function using getKey().
Function arguments
The FunctionArgument class is used to represent a function or a tag in Minecraft. When retrieving an instance of the argument, it will return a FunctionWrapper[], where each FunctionWrapper consists of a Minecraft function.
Therefore, if a user supplies a single function, the FunctionWrapper[] will be of size 1, and if the user supplies a tag which can consist of multiple functions, the FunctionWrapper[] will consist of the array of functions as declared by that tag.
Example - Minecraft's /function command
Since it's a little difficult to demonstrate a custom use for the FunctionArgument, we will show how you can implement Vanilla Minecraft's /function command. In this example, we want a command that uses the following structure:
/runfunction <function>
When provided with a function, it will execute that function. If instead a tag is provided, it will execute that tag (i.e. execute all functions declared in that tag).
LinkedHashMap<String, Argument> arguments = new LinkedHashMap<>();
arguments.put("function", new FunctionArgument());

new CommandAPICommand("runfunction")
    .withArguments(arguments)
    .executes((sender, args) -> {
        FunctionWrapper[] functions = (FunctionWrapper[]) args[0];

        //Run all functions in our FunctionWrapper[]
        for(FunctionWrapper function : functions) {
            function.run();
        }
    })
    .register();
Permissions
Permissions let you control which players are allowed to execute which commands. This is handled using the CommandPermission class, which has the following uses:
| Permission | What it does |
|---|---|
CommandPermission.OP | Requires OP to execute the command |
CommandPermission.NONE | Anyone can execute the command |
CommandPermission.fromString("my.permission") | Requires a specific permission node to execute the command |
In addition to the CommandPermission class, there are two different ways to assign permissions (compared to the simple CommandSender.hasPermission() method that is provided by Bukkit).
Adding permissions to commands
To add a permission to a command, you can use the withPermission(CommandPermission) method when declaring a command.
Example - /god command with permissions
Say we created a command /god that sets a player as being invulnerable. Since this is a pretty non-survival command, we want to restrict who can run this command. As such, we want our player to have the permission command.god in order to run this command. To do this, we simply use the withPermission(CommandPermission) method from our command builder:
// Register the /god command with the permission node "command.god"
new CommandAPICommand("god")
	.withPermission(CommandPermission.fromString("command.god"))
	.executesPlayer((player, args) -> {
		player.setInvulnerable(true);
	})
	.register();
Registering permissions to arguments
For further fine-tuning of permission management, the CommandAPI allows you to add permissions to individual arguments. This prevents the user from executing a command with a specific argument if they do not have a specific permission.
This is done by using the withPermission(CommandPermission) method at the end of an argument.
If a player does not have the required permission:
- The argument hover text which suggests what the command is will not be shown
- The player will receive an error if they try to type something in for that argument
- Suggestions, such as a list of materials or players, will not be shown
Example - /kill command with argument permissions
For example, say we're registering a command /kill:
/kill          - Kills yourself
/kill <target> - Kills a target player
We first declare the command as normal. Nothing fancy is going on here:
// Register /kill command normally. Since no permissions are applied, anyone can run this command
new CommandAPICommand("kill")
	.executesPlayer((player, args) -> {
		player.setHealth(0);
	})
	.register();
Now we declare our command with arguments. We use a PlayerArgument and apply the permission to the argument. After that, we register our command as normal:
// Declare our arguments
LinkedHashMap<String, Argument> arguments = new LinkedHashMap<>();
arguments.put("target", new PlayerArgument().withPermission(CommandPermission.OP));

// Adds the OP permission to the "target" argument. The sender requires OP to execute /kill <target>
new CommandAPICommand("kill")
	.withArguments(arguments)
	.executesPlayer((player, args) -> {
		((Player) args[0]).setHealth(0);
	})
	.register();
Developer's Note:
As you can see, there are multiple ways of applying permissions to commands with arguments. In the
/godcommand shown above, the permission was applied to the whole command. In the/killcommand shown above, the permission was applied to the argument.There's not really much difference between the two methods, but I personally would use argument permissions as it has greater control over arguments.
Aliases
Aliases for commands can be added by using the withAliases() method when registering a command. Aliases allow you to run the same command with a different 'name' from the original registered command name.
Example - Using aliases for /getpos
In this example, we register the command /getpos that returns the command sender's location. We apply the aliases /getposition, /getloc, /getlocation and /whereami as well, using the withAliases() method.
new CommandAPICommand("getpos")
    // Declare your aliases
    .withAliases("getposition", "getloc", "getlocation", "whereami")

    //Declare your implementation
    .executesEntity((entity, args) -> {
        entity.sendMessage(String.format("You are at %d, %d, %d",
            entity.getLocation().getBlockX(),
            entity.getLocation().getBlockY(),
            entity.getLocation().getBlockZ())
        );
    })
    .executesCommandBlock((block, args) -> {
        block.sendMessage(String.format("You are at %d, %d, %d",
            block.getBlock().getLocation().getBlockX(),
            block.getBlock().getLocation().getBlockY(),
            block.getBlock().getLocation().getBlockZ())
        );
    })

    //Register the command
    .register();
Command conversion
Since the CommandAPI is used to register commands as a vanilla Minecraft command, you may want to use other plugins that are not written with the CommandAPI. For instance, if you want to include a command from a plugin which doesn't use the CommandAPI in a commandblock, (such as the /execute command), you can use the CommandAPI's command conversion system.
Developer's Note:
The command conversion system is nowhere near perfect. It tries its best to connect Bukkit plugins to vanilla Minecraft commands, but is not guaranteed to run flawlessly. If possible, consider forking/requesting a plugin and writing it with compatibility for the CommandAPI.
Entire plugins
To register all commands that are declared by a plugin, the Converter.convert(Plugin) method can be used. This attempts to register all commands declared in a plugin's plugin.yml file, as well as any aliases or permissions stated in the plugin.yml file.
It is important to note that the plugin must be loaded before your plugin before attempting conversion. (Use loadbefore: [YourPlugin, CommandAPI] to ensure it loads before your plugin)
Example - Converting commands for a plugin
Say you have some plugin.yml file for a plugin that adds some basic functionality to a server. The plugin in this example is called "myPlugin":
name: myPlugin
main: some.random.package.Main
version: 1.0
commands:
  gmc:
    aliases: gm1
  gms:
  i:
    permission: item.permission
As you can see, it declares 3 commands: /gmc, /gms and /i. Since this plugin hasn't been told to load before the CommandAPI, we must first modify the plugin.yml file:
name: myPlugin
main: some.random.package.Main
loadbefore: [CommandAPI]
version: 1.0
commands:
  gmc:
    aliases: gm1
  gms:
  i:
    permission: item.permission
Now that the plugin has been loaded before the CommandAPI, we can now begin writing our own plugin that uses the CommandAPI converter. We will call this plugin "MyCoolPlugin":
public class MyCoolPlugin extends JavaPlugin {

    @Override
    public void onEnable() {
        Converter.convert(Bukkit.getPluginManager().getPlugin("myPlugin"));
        //Other code goes here...
    }

}
To ensure that MyCoolPlugin loads after myPlugin, we must ensure that the plugin.yml for myPlugin states this. So, we update the plugin.yml for myPlugin again:
name: myPlugin
main: some.random.package.Main
loadbefore: [MyCoolPlugin, CommandAPI]
version: 1.0
commands:
  gmc:
    aliases: gm1
  gms:
  i:
    permission: item.permission
When this is run, the commands /gmc, /gm1, /gms and /i will all be registered by the CommandAPI.
So to summarise, our plugin loading order is the following:
\[ \texttt{myPlugin} \xrightarrow{then} \texttt{CommandAPI} \xrightarrow{then} \texttt{MyCoolPlugin} \]
Only specific commands
In addition to converting the whole plugin, the CommandAPI allows you to convert single commands at a time using the Converter.convert(Plugin, String) method, where the String argument refers to the command name as declared in the plugin's plugin.yml file.
Upgrading guide
From version 2.3 to 3.0
The CommandAPI's upgrade from version 2.3 to 3.0 is very intense and various refactoring operations took place, which means that plugins that implement the CommandAPI version 2.3 or will not to work with the CommandAPI version 3.0. This page outlines the few major changes and points you to the various pages in the documentation that covers how to use version 3.0.
Imports & Renaming
The default package name has been changed. Instead of being registered under the io.github.jorelali package, the CommandAPI has been moved to the dev.jorel package:
\[\texttt{io.github.jorelali.commandapi.api}\rightarrow\texttt{dev.jorel.commandapi}\]
To organise classes with other classes of similar functions, new packages have been introduced. These can be fully explored using the new JavaDocs
Removed classes & Alternatives
To reduce redundancies, the CommandAPI removed a few classes:
| Removed class | Alternative |
|---|---|
SuggestedStringArgument | Use .overrideSuggestions(String[]) for the relevant argument, as described here |
DefinedCustomArguments for Objectives | Use ObjectiveArgument |
DefinedCustomArguments for Teams | Use TeamArgument |
Command registration
The way that commands are registered has been completely changed. It is highly recommended to switch to the new system, which is described here.
The following methods have been removed:
CommandAPI.getInstance().register(String, LinkedHashMap, CommandExecutor);
CommandAPI.getInstance().register(String, String[], LinkedHashMap, CommandExecutor);
CommandAPI.getInstance().register(String, CommandPermission, LinkedHashMap, CommandExecutor);
CommandAPI.getInstance().register(String, CommandPermission, String[], LinkedHashMap, CommandExecutor);

CommandAPI.getInstance().register(String, LinkedHashMap, ResultingCommandExecutor);
CommandAPI.getInstance().register(String, String[], LinkedHashMap, ResultingCommandExecutor);
CommandAPI.getInstance().register(String, CommandPermission, LinkedHashMap, ResultingCommandExecutor);
CommandAPI.getInstance().register(String, CommandPermission, String[], LinkedHashMap, ResultingCommandExecutor);
Additionally, the CommandAPI is no longer accessed by using CommandAPI.getInstance(). This has been replaced with static methods that can be accessed without an instance of the CommandAPI, so you can use the following:
CommandAPI.fail(String command);
CommandAPI.canRegister();
CommandAPI.unregister(String command);
CommandAPI.unregister(String command, boolean force);
Troubleshooting
This section basically summarizes the list of things that could go wrong with the CommandAPI and how to mitigate these circumstances.
Server/Plugin reloading
Due to the implementation of the CommandAPI, the CommandAPI does not support plugin reloading for plugins that use the CommandAPI. This includes, but is not limited to:
- The
/reloadcommand which reloads all plugins on the server - Plugin reloading plugins, such as PlugMan
- Any form of plugin enabling/disabling process for plugins which register commands via the CommandAPI
Developer's Note:
Plugin reloading gets very complicated with respect to the CommandAPI. Since the loading sequence of Minecraft commands is so picky, reloading the CommandAPI or a plugin which registers commands can cause commands to be re-registered. This can lead to very odd effects, such as command collisions (commands just don't work), to duplicate commands being registered under different namespaces (e.g. plugins are registered under Bukkit as well as Minecraft). These effects are not "100% guaranteed" and have only been seen during dodgy tests. In short, do not enable or reload plugins, and absolutely do not reload the server with
/reload
Players cannot connect/timeout when joining
If players cannot connect, this could be due to the size of the command data packet. To see the resultant packet being sent to players when they log in, enable the create-dispatcher-json: true setting and view the file size of the resultant file. If the file size is abnormally large (Over 2MB is considered very large), consider reducing the number of LiteralArguments which your plugin uses.
Command conversion throws a NullPointerException
This is likely caused by the fact that the plugin you want to convert hasn't been loaded yet. Ensure that it loads before your plugin by adding the following to the target plugin's plugin.yml file:
loadbefore: [YourPlugin, CommandAPI]
My issue isn't on here, what do I do?!
If you've found a bug that isn't solved here, submit a bug report on the CommandAPI's issues page and I'll try my best to resolve the issue!
Afterword
Developer's Note:
Congratulations on making it to the end of the documentation! I hope it was easy to understand everything ... I feel like it's a bit content heavy.
This project is by far my most worked on and probably the project I'm most proud of. You can read about the creation of the CommandAPI in my blog post here.
I'd like to give credit to all of the people that have opened issues on GitHub, that have truly made it what it is now. In addition to my stargazers, I'd like to personally thank:
- Combustible, who was my #1 supporter and motivated me to keep this project alive after its initial release. They also helped raise awareness of the CommandAPI throughout Spigot's forums.
- DerpNerb, who gave me the idea to convert the CommandAPI to a Maven project which resulted in making the CommandAPI much more accessible for everyone.
- Draycia, who suggested that I put
CommandSenderobjects insideDynamicSuggestedStringArguments, which allow dynamic arguments to be much more powerful. - HielkeMinecraft, who suggested various improvements for the
LocationArgumentclass; suggested adding results and successes for commands and being a great bug reporter in general. - i509VCB, who is an absolute genius and a really good bug spotter. They pointed out a severe bug that made libraries depending on the CommandAPI depend on Brigadier; created the documentation for using the CommandAPI with Gradle and suggested using the NBTAPI to include NBT support.
- Minenash, who was the driving force for the 3.0 release which adds a plethora of additional arguments. They continued to research, write documentation examples, bug test, code review and basically oversee the project throughout its development.
- Tinkot, who gave a review of the CommandAPI on its spigot page. This motivated me to fix a 6 month old bug. Somehow.
- ZiluckMichael, who truly changed the CommandAPI for the better. Refactored the entire code base to make the CommandAPI much more maintainable, as well as removing a lot of unnecessary reflection.
I never really expected more than 5 or so people to use this API, so it was truly an exciting time creating this for everyone - seeing everyone's responses, issues and problems helped me keep going.
In short, thank you, and everyone else that helped make the CommandAPI what it is.